Installing a new shower can transform your Cincinnati bathroom without needing a full remodel. With the right planning, materials, and codes, you can upgrade comfort and value safely. A clear process prevents leaks, delays, and added costs.
CincyBath helps local homeowners get durable, code-compliant showers designed for Cincinnati’s homes. Our licensed team handles design, waterproofing, and installation with transparent pricing and respectful cleanup. That means less stress and lasting results.
This guide covers what you need to know—planning, cost expectations, materials, timelines, and accessibility ideas—to help you prepare for your shower installation confidently and efficiently.
Planning Your Shower Installation
Proper planning sets the foundation for a successful shower installation. You need to evaluate your bathroom’s layout, decide on the best shower style for your needs, and assemble the right tools and materials before starting the project.
Assessing Bathroom Space
Start by measuring the available space accurately, including the width, length, and ceiling height. Check for plumbing access points and any obstructions like windows, vents, or existing fixtures. These measurements help ensure your new shower fits without compromising bathroom flow.
If you’re converting a bathtub to a walk-in shower, verify if the drain can be repositioned or if the existing plumbing works with the new layout. Consider accessibility features too, like low-threshold entries or built-in seating, especially if mobility is a concern.
Knowing your space will help you decide between a prefabricated unit or a custom tile setup. For Cincinnati homes, older builds may require extra attention to local codes and venting requirements.
Selecting Shower Type
Choosing the right shower type affects both function and style. Common options include walk-in showers, prefabricated fiberglass or acrylic units, and custom tiled enclosures. Walk-in showers are popular for their easy access and open feel, often installed using durable, non-porous surrounds that resist mold.
Consider the materials: acrylic and composite kits are low-maintenance and often installed in as little as one day. Custom tiled showers offer design flexibility but require longer installation and more upkeep. You can also add features like grab bars, built-in benches, and slip-resistant floors for safety.
We provide licensed installers and premium materials tailored for Cincinnati homes, ensuring your shower blends usability with lasting quality.
Gathering Tools and Materials
Having the correct tools and materials on hand avoids delays during installation. Essentials include a level, measuring tape, drill, adjustable wrench, plumber’s putty, silicone sealant, and waterproof backer board.
Select durable materials suited to Cincinnati’s humid climate. Non-porous acrylic or composite surrounds are recommended because they resist mold and mildew. For luxury, porcelain or ceramic tiles paired with LVP flooring offer both style and durability.
Don’t forget plumbers’ supplies such as piping, valves, and fittings compatible with your home’s system. If you’re uncertain about the requirements, a free in-home consultation can help you create an itemized list and transparent quote before work begins.
Preparing the Bathroom for Installation
Before installing your new shower, you need to clear the space thoroughly, confirm that plumbing and electrical systems meet code and function correctly, and ensure the area is properly waterproofed. These steps prevent costly mistakes and protect your home from water damage.
Demolition and Removal of Old Fixtures
Start by disconnecting water supply lines and turning off the main shutoff valve. Use a pipe wrench to safely loosen plumbing connections. Remove old shower doors, panels, tiles, and fixtures carefully to avoid damaging surrounding walls or floors.
Dispose of debris promptly to keep your worksite clean and safe. Check the rough-in plumbing and wall studs for damage once the old components are out. This cleanup sets a solid foundation for the new installation, saving you time and preventing surprises later.
Ensuring Worker Safety With Fall Protection
When installing showers—especially in bathrooms with raised floors, tubs, or when using scaffolding near ceiling heights—workers may be exposed to fall hazards. It’s essential to adopt fall protection measures like guardrails, safety nets, or personal fall arrest systems.
For residential construction tasks performed six feet or more above lower levels, follow official regulations. The Occupational Safety and Health Administration (OSHA) requires conventional fall protection unless a written, site-specific plan justifies alternative methods.
Ensuring Proper Plumbing and Electrical Setup
Verify that all plumbing lines are secure, leak-free, and positioned according to the new shower design. Adjustments may require specialized tools like pipe wrenches or professional help to meet Cincinnati building codes.
Electrical wiring for lighting or ventilation must be installed by a licensed electrician. All fixtures should be GFCI protected for safety. Confirm that drain placement matches the shower base specifications to avoid misalignments during installation.
Waterproofing the Shower Area
Waterproofing is critical to prevent leaks and mold growth. Apply a waterproof membrane or backer board to walls and floors within the shower footprint. Pay special attention to corners, seams, and around plumbing penetrations.
Use non-porous materials like acrylic or composite surrounds for durability and ease of cleaning. Ensure the waterproofing extends beyond visible shower walls to protect adjacent areas. Proper waterproofing supports long-lasting performance and reduces maintenance.
For detailed guidance on these preparatory steps, visit this step-by-step guide to shower installation offered by experienced professionals.
Installing the Shower Base and Pan
The shower base and pan form the foundation of your new shower, ensuring proper drainage and structural support. Precision in positioning and securely connecting the drain system are critical to prevent leaks and water damage.
Positioning and Securing the Shower Pan
First, place the shower pan on the prepared subfloor, ensuring the drain hole aligns perfectly with your plumbing. The pan must sit flat without rocking or gaps.
Check the level using a carpenter’s level. If the pan isn’t level, use shims or adjust the subfloor as needed before securing it.
Secure the pan to the floor with screws or adhesive recommended by the manufacturer. Avoid overtightening, which can crack acrylic or composites.
Trusted contractors use premium, durable materials designed for Cincinnati’s older homes and local codes. Proper positioning helps create a stable base for walls or tile installation and avoids costly repairs.
Connecting the Drain
The drain assembly connects your shower pan to the home’s plumbing, directing water safely away. Begin by assembling the drain according to the pan’s specifications.
Apply plumber’s putty or silicone sealant around the drain flange for a watertight fit. Insert the drain into the pan’s waste outlet and tighten the locknut underneath.
Connect the drain pipe to the home’s existing drainage system, making sure all joints are secure and leak-free. Test the connection by running water and inspecting for leaks.
Proper drain installation is essential for a waterproof shower. Our licensed installers handle this step carefully, matching Cincinnati plumbing codes and ensuring lasting performance. For a visual walkthrough, see this detailed guide on how to install a shower pan.
Setting Up Shower Walls and Enclosures
Setting up your shower walls and enclosure requires precise preparation and attention to waterproofing. You’ll need to choose durable materials and follow installation steps carefully to ensure long-term performance and a leak-free fit.
Installing Shower Walls
Start by selecting non-porous, mold-resistant wall panels like acrylic or composite materials. These materials resist mildew and are easier to clean than traditional tile grout.
Measure your shower space accurately and cut panels to size. Apply waterproof adhesive evenly for a strong bond to studs or backing walls. Use a level to keep panels straight during installation.
Seal all joints and corners with waterproof silicone caulk to prevent leaks. If you choose tiled walls, install a suitable waterproof membrane beneath tiles and grout properly to maintain water tightness.
A professional or licensed installer ensures that waterproofing meets Cincinnati codes, which is crucial, especially in older homes. This approach also allows for speedy installs that can often be completed in one day.
Building or Fitting a Shower Stall
If you’re building a shower stall, start with a sturdy, level base like a pre-made shower pan or custom tile base. The base should be fully sealed to the subfloor to avoid water damage.
Frame the stall walls using treated wood or metal studs and apply waterproof backer boards before wall panel installation. Make sure corners and seams are fully waterproofed using tapes and membranes designed for showers.
For fitting an existing shower stall, inspect and replace any damaged materials before installing new surrounds. Your choice of door style (sliding, hinged, or fixed panel) must be compatible with your enclosure dimensions and mounting surfaces.
Working with a licensed local team guarantees compliance with Cincinnati’s building codes and smooth door operation. Their experience reduces cleanup and prevents costly rework. For detailed advice on installing shower wall panels, see this step-by-step guide.
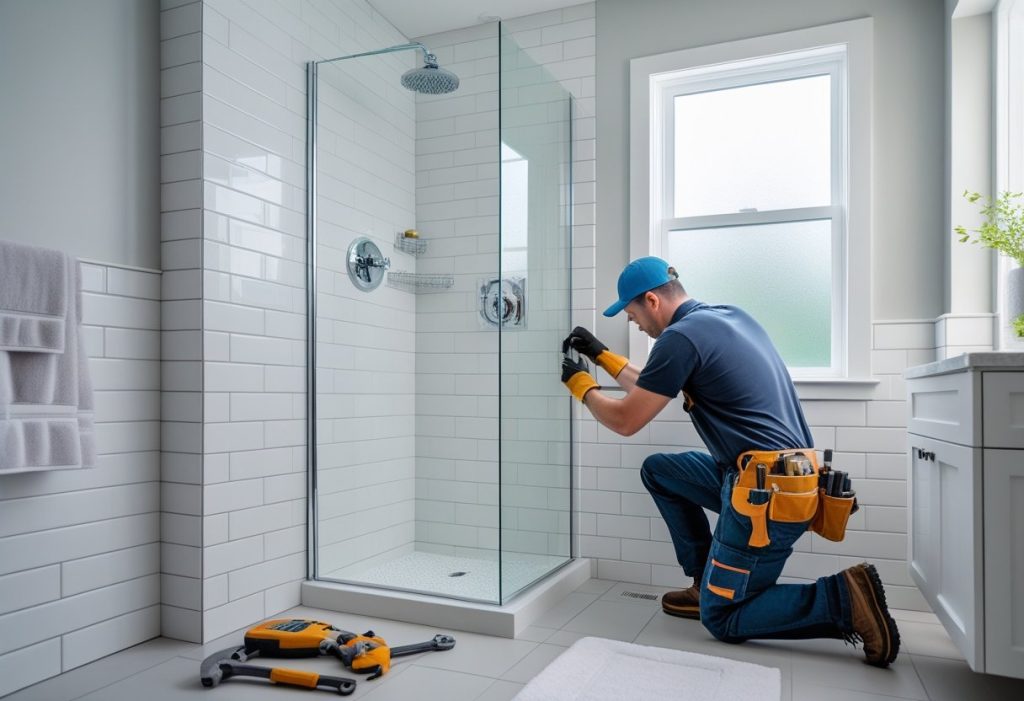
Fitting Shower Fixtures and Accessories
Properly attaching your shower fixtures and accessories ensures functionality and durability. Attention to detail during installation helps prevent leaks and guarantees smooth operation over time.
Attaching Shower Fixtures
Begin by securely mounting the showerhead, faucet, handles, and any grab bars or seating according to the manufacturer’s instructions. Use Teflon tape on threaded connections to prevent leaks and ensure a tight fit. Align fixtures so that water flow and temperature controls operate smoothly.
If installing a shower door or enclosure, follow the precise measurements for mounting brackets and seals. Ensure wall panels are flush and sealed at joints to maintain waterproof integrity.
Using premium materials like non-porous acrylic panels and ceramic fixtures helps avoid mold and long-term wear. A steady hand and proper tools—drill, screwdrivers, level—are essential for a clean, accurate install.
Testing for Leaks and Proper Operation
Once fixtures are attached, turn on the water supply and test all components individually. Check for drips around joints and handles. Confirm that the water pressure and temperature control meet expectations.
Use a wrench to tighten loose fittings if minor leaks appear, but avoid overtightening, which could crack fixtures. Observe the drain to make sure water flows efficiently without pooling.
Run a full test for several minutes to catch intermittent leaks. Testing before finishing trims or sealing will save time and prevent costly rework. This approach aligns with licensed installers’ protocols in Cincinnati who specialize in durable, trouble-free shower installations.
Finishing Touches and Cleanup
Completing your shower installation means focusing on the details that protect your investment and ensure lasting performance. Proper sealing prevents water damage, while a thorough final cleanup leaves your bathroom ready for use.
These final steps help maintain the appearance and safety of your new shower.
Applying Sealant and Caulking
Apply a high-quality silicone sealant along all joints where the shower enclosure meets the walls, base, and door. This stops water from seeping behind tiles or panels. Use a steady hand to lay an even bead, then smooth it with a caulk tool or your finger dipped in water for neat results.
Pay special attention to corners, seams around fixtures, and any gaps created during installation. Avoid using regular acrylic caulk as it lacks the waterproof flexibility needed for showers. Allow the sealant to cure fully before exposing it to moisture—usually 24 hours.
Well-applied caulking protects your shower from mold and water damage, ensuring durability without frequent repairs. Local installers specialize in precise sealant application, helping your Cincinnati bathroom stay dry and safe.
Final Cleaning and Inspection
Once the sealant has cured, remove excess debris, dust, and any leftover construction materials from the shower and surrounding areas. Clean the surfaces with a mild, non-abrasive cleaner suited to your shower material, such as non-porous acrylic or ceramic tile, to avoid damage.
Inspect all fixtures, drains, and seals for proper alignment and function. Check that doors open smoothly and water drains away efficiently with no pooling. A final walkthrough helps catch any issues before regular use.
Our licensed installers provide a detailed quality check during this phase to ensure your shower meets Cincinnati’s local codes and your expectations. A clean, inspected space means you can enjoy a functional and attractive bathroom without surprise repairs.
Enjoy a Durable, Worry-Free Shower Installation
A well-installed shower improves your bathroom’s comfort, safety, and efficiency for years to come. From proper waterproofing to code-compliant plumbing, each step contributes to a reliable, low-maintenance space that fits your home and budget.
CincyBath brings local experience and craftsmanship to every Cincinnati shower installation. Our team focuses on clear communication, durable materials, and neat job sites. This way, you can enjoy a clean, lasting upgrade without the hassle of a full remodel.
Ready to plan your project? Get a free in-home consultation to review styles, materials, and pricing—then receive your detailed, itemized quote before work begins.
Frequently Asked Questions
Installing a shower involves precise steps, proper plumbing, and choosing the right materials for your bathroom’s layout. You’ll want to ensure lasting durability, water-tightness, and compliance with local codes while optimizing space and accessibility.
What Are the Steps to Install Shower Wall Panels in a Bathroom?
First, prepare the shower walls by cleaning and making sure they are dry and flat. Measure and cut the panels to fit your shower space. Then, apply an adhesive recommended by the manufacturer and press the panels firmly in place, sealing all seams with waterproof caulk to prevent leaks.
Can a Walk-In Shower Kit Be Installed as a DIY Project, or Should a Professional Be Hired?
A walk-in shower kit can be installed by a skilled DIYer with plumbing experience, especially if working with prefabricated panels and bases. However, hiring a licensed professional ensures compliance with Cincinnati codes, precise fitting, and leak-proof plumbing, often completing the install in as little as one day.
What Is the Process for Correctly Installing Shower Plumbing?
Start by shutting off the water supply. Lay out your supply lines and drain according to local plumbing codes, ensuring proper slope for drainage. Connect hot and cold water lines to the shower valve, install the showerhead and controls, and test for leaks before closing walls.
How Do I Build a Walk-In Shower in a Small Bathroom Space?
Maximize space by opting for low-threshold entrances and clear glass panels to open up the room visually. Use compact fixtures and smooth, non-porous wall materials to reduce maintenance. Planning for grab bars and built-in seating can enhance safety without sacrificing space.
Is It Possible to Install a New Shower Over Existing Bathroom Tile?
Yes, installing over existing tile is possible if the surface is clean, level, and structurally sound. Specialized wall panels designed for this purpose can be adhered directly to tile, saving demolition time and keeping costs down. Proper sealing of edges is critical to prevent water infiltration.
What Are the Requirements for Adding a Shower to a Bathroom That Previously Did Not Have One?
You will need to install or modify plumbing for water supply and drainage, ensure proper waterproofing, and meet local building codes. Ventilation might require upgrading to handle increased moisture.
Using durable materials like non-porous acrylic surrounds and following a licensed installer’s guidance—such as from CincyBath—helps guarantee a reliable, long-lasting shower.